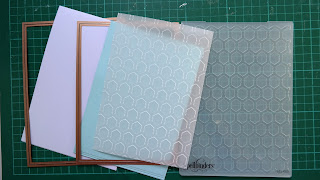
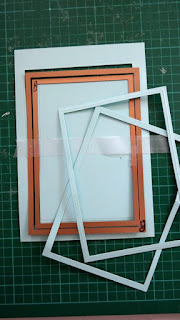
Todays card is really easy to create using just a few basic dies and an embossing folder. Use any folder that you have in your "Stash" and like wise the flowers and the sentiment. You are sure to make a really pretty card and here are the steps to follow ...
Spellbinders Supplies:
- S6-001 5x7 Matting Basics A
- S6-002 5x7 Matting Basics B
- S4-114 Classic Circle
- S4-430 Foliage Flourish
- SEL-009 Embossing Folder
Other Supplies:
- Flowers
- Glitter
- Diamante
- Woodware stamps
Instructions:
Create a Hinged Card in white with Matting Basics A #7
Cut two panels with #7 Matting Basics B ... One coloured and the other in Parchment.
And remember that die #1 is always the smallest
Emboss the parchment in your folder.
(Tip: if your parchment is thin then sandwiching it between copy paper will help to stop it from tearing as you emboss it)
With dies #5 and #6 tape them together onto some more coloured card and cut three frames.
Taping them together ensures that all your frames will be the same
Glue them all together
With smallest of the two circle dies cut an aperture into the parchment piece where you would like it to sit and then add the glued frame to the top.
Save any surplus die cuts for another project
With #7 and #6 from Matting Basics B repeat the taping and cutting process to make two frames and glue these together also and add to the top of the parchment
Stamp and emboss your sentiment onto a circle of white card cut with die #6 and position it on the coloured card inside the circle aperture. To make sure that it is in the correct position place the parchment on top of your coloured card, where you want it to be, and then slot the stamped sentiment circle in to the space.
Make sure it is straight and carefully remove the parchment panel ... without moving the sentiment circle. You can then glue the sentiment circle permanantly in place knowing it is in the correct space
Make sure it is straight and carefully remove the parchment panel ... without moving the sentiment circle. You can then glue the sentiment circle permanantly in place knowing it is in the correct space
Add small pieces of foam tape around the circle and the outer frame so that they cannot be seen from the front. This raises up the parchment from the coloured layer
Glue them all onto the white base card and dress with flowers as you like.
I have added extra sparkle to my card by cutting up some diamante "Bling" and laying it around the flowers
More tomorrow ...
Hugs xx
More tomorrow ...
Hugs xx


Morning Christina, a beautiful card you make it seem so easy but it will be trying to get your sentiment in the centre of the frame but I am going to give it go and keep my fingers crossed.
ReplyDeleteNancyd xx
I have added in some extra details to the post on how to position the sentiment circle correctly on your card and I hope this will help you when you make the card Cxx
DeleteLovely card Christina with a great Tutorial and tips , thank you.
ReplyDeleteTake Care
Elaine H X
wow that looks terrific and easy enough for those of us not blessed with your talent
ReplyDeletecheers Kaye
Thank you Christina for this tutorial,the card is beautiful. I like using vellum but always have trouble with embossing, now I know the trick
ReplyDeleteMorning Christina,
ReplyDeleteLovely card.
Lydia
X
Lovely card as expected. Thanks Christina xx
ReplyDeleteHi Christina
ReplyDeleteI'll definitely be having a go at this one as I love embossed parchment. Thanks for the tutorial
Love & best wishes
Jenny C xxx
Morning Christina
ReplyDeleteSuch a pretty card. I always think frames gives a nice finishing touch :)
Crafty smiles
June x
Gorgeous card and great tutorial as always. Hugs Jennifer xx
ReplyDeleteGood Morning Christina :) A very pretty card this morning and lovely tutorial! Thank you so much for all the work you put into your tutorials for us. Enjoy a wonderful crafty kind of day. Big Hugs.
ReplyDeleteHi Christina
ReplyDeleteI like this card very much. I think the Matting Basics and the Neatabilities Circles will have to go onto my Wish List.
Margaret xx
A truly lovely card, Christina. I am so inspired!
ReplyDeleteVery pretty card....I like the soft touch of the embossed vellum....well done Christina
ReplyDeletetfs
Love the concept for this card. Do not get me wrong, I love the card also. This is a novel concept for me and I find it very attractive.
ReplyDeleteThank You for sharing this tutorial
Christine form Ontario
Hi Christina,
ReplyDeleteA beautiful card and a nice easy tutorial this week. It's one that I can actually try out as I have all the dies...YAY!!!.
A really lovely idea, thank you for the tutorial Christina, the card is really beautiful...luv Ursula xx
ReplyDeleteLovely card and great tutorial. Thank you.
ReplyDeleteLove Val in Spain x
Awesome card, you always inspire me..... your truly ans ARTIST!
ReplyDeleteCrafty Hugs
Wonderful Card!!!
ReplyDeleteThank you for the online tutorial.
Would love to see you do this one on a YouTube video!!
gailgale
Gorgeous card, love the tutorial and pretty flowers.
ReplyDeleteHugs
Linda xxx
Afternoon Christina, Gorgeous card and
ReplyDeletethank you for making the tutorial !
Maria x
Love the use of vellum! Thanks for directions on how to place your sentiment and the hint to emboss the vellum with an extra piece of paper.
ReplyDeleteVery elegant card! Thanks for the tutoria.l
ReplyDeleteI absolutely adore this card. I love the colors, love the die, love your flowers..just everything. Thank you so much for sharing, Christina!
ReplyDeleteA beautiful card Christina love the flowers and the colours are really stunning.
ReplyDeleteKind regards
Anne Owens xx
Evening Christina. Gorgeous card snd one which following your tutorial, I'm sure I can copy. Thank you. X
ReplyDeleteWow! Such a beautiful card Christina. Thank you for a brilliant tutorial.
ReplyDeleteA beautiful card once again. Love the use of the vellum It changes the whole card
ReplyDeleteJust a beautiful card! This would make anyone's day! Thanks for the inspiration!
ReplyDeletegorgeous card Christina. hugs xx
ReplyDeleteAbsolutely beautiful! I love your cards.
ReplyDeleteI love the colours in this card Christina, just beautiful.
ReplyDelete