Beautiful Card Designs Made Easy

December 17, 2015

Greetings to you ...

Hi Everybody,

I will move away from Christmas cards shortly I promise,  and start with spring flowers and summer displays again ... definitely my favourite type of card.

But for now this Christmas flowery card has used some of the beautiful Poinsettias from  Wild Orchid crafts

Into this mix I have added Roses and a little Holly Sprig

The background is created with  Grate Effect   which has been layered over Antique Gold card and then I have added in  Fleur de Elegance  also in gold

The little die cut sentiment is from Craft Stash  and there are lots of different phrases for you to choose

The cheery red ribbon is tied into a single bow with a shiny dazzler in the centre to cover the knot.

Altogether a pretty and traditional type of card and if you swap out the sentiment it could be for any other occasion

More tomorrow ...

Hugs xx


December 16, 2015

International Ambassadors Informal Blog Hop

Hi Everybody,

Here we are again with another blog hop brought to you by the International Ambassadors and once again we hope you will join in with us

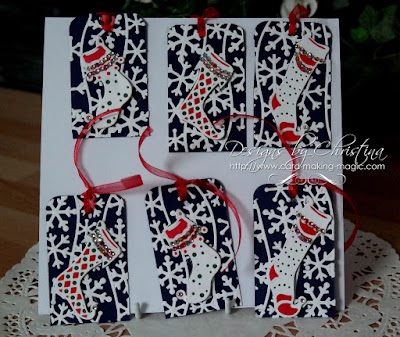
The theme for this month was Christmas Tags as we are so close to sending out all the lovely gifts for friends and family.

Here I have created a set of little tags that have used the same dies throughout. 

I used the plain edge to the Build a Tag  to create the base shape and then added the Snowflakes from the Flurries  set.

Each tag has one of the Fancy Trio  attached and decorated with gemstones,  then threaded with red ribbon, to make the attachment to your gift. Very quick and easy to do as the dies do all the work for you.

I am sure that the other Ambassadors will have some delights for you to see so pop along to each one and leave them a comment.

Yvonne Van der Grijp The Netherlands
Linda Lucas  Australia
Christina Emberson  UK
Christina Griffiths     (you are here)

This is our way of introducing you to each designers individual style and helping you to get to know us a little better.  Thank you for taking the time to visit and for all the comments you so graciously leave

More tomorrow ...

Hugs xx

December 15, 2015

Tuesday Tutorial - Pierced Rectangles

 Hi Everybody,

Adding some accent to the sides of your cards can make them really pretty and with dies that give you the pierced edges it is very easy to achieve. 

There are circles, squares, ovals and shapes that all have this look to them and today I am using the Pierced Rectangles from Spellbinders Celebrations Collection.
Spellbinders Supplies:

Other Supplies:
With die #6 and #5 placed one inside the other onto some white card,  cut and emboss the panel
This will create the pierced edge around the rectangle.
Repeat the process with #4 and #3 to make a smaller panel. 
Stamp your chosen sentiment in the position you want it on the smaller panel and then use any embossing folder you have to add texture.
 (Stamp first as it is harder to stamp on an uneven surface once you have embossed)
Create a base card in blue that is slightly larger than the largest pierced panel.
Create another mat in blue that is slightly larger than your embossed panel
Glue each of the white layers to the blue and then layer them together with foam pads in between
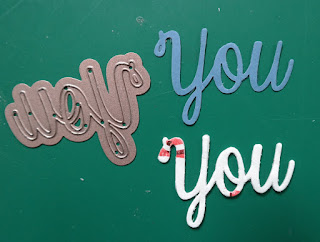
Cut the word "YOU" from some blue card and again from some double sided adhesive foam. remove the top backing sheet and layer the two together.
Remove the backing from the other side and add it to your card in the position you want it near your stamped sentiment.
The position will depend on which one you chose to use as there are many on the stamp sheet
Vary the  stamped sentiment and the colours and the flowers to suit the recipient for a new look each time you make the card ... and make a batch of them in one go so that you always have some ready for that unexpected request 

More tomorrow ...

Hugs xx


December 14, 2015

Houndstooth Background

Hi Everybody,

This pretty background is created with the new Houndstooth  Card Creator from Spellbinders.

It is in two parts giving you a complete cutting frame that can be used separately to make the base.

Cut it twice and  Create a Hinged Card and you are ready to go.

I used the  Letterpress Technique with Black Soot Distress Ink on the patterned piece and this is the result.

I added in some  Feathers  and this would be extremely well suited to any male cards that you have to make.
I dressed this one up with flowers from   Wild Orchid Crafts  and a black pearl flourish from  Want2Scrap

The sentiment has been cut with  Lacey Circles  which is a really old Spellbinders die but it is one I use time and time again

More tomorrow ...

Hugs xx


December 12, 2015

Todays winner is ...

Hi Everybody,

Been doing a little Christmas shopping today but I was glad to get home again into the warmth out of all that cold and wet.  I haven't put the tree up yet but that is on my list for next week. 
 Finally got the decorating completed and the carpets shampooed so Santa can come whenever he wants to now.

We finally did the draw for the card on offer and many of you have seen it as black and white ... so whoever wins it I hope you won't be disappointed  with it because it is dark brown and cream. 
 The cream card has a lovely fine silver line foiled through it.

The name chosen this week is you

Addieper
so if you would email me please 
christina@card-making-magic.com
with your postal address then I will get the card off to you straight away.

You have 48 hours to claim it and I hope you will like it when it arrives. Please let me know that you have the card safely.

No blog post tomorrow but I will be back with you on Monday

Hugs xx

December 11, 2015

Friday Freebie 097

Hi Everybody,

This is a card that I made earlier this year and once again I have used several different ides to create the look.

One of my favourite dies is the one that creates the fancy edge I have added to the top.

It is  Petite Monarch  and it is such a useful little die  to add that finishing touch.

I have also used the  Baby Bunting  and layered it with foiled card.

The flowers are from Wild Orchid Crafts and are a mixture of roses and Gypsophillia

The pearl flourish is from Want2Scrap 

So if this is a card that you would like to have then all you need to do is leave me a comment and pop back tomorrow to see if your name is the one drawn from the hat.

More tomorrow ...

Hugs xx


December 10, 2015

Adding Foil

Hi Everybody,

 A few weeks ago I treated myself to the  Heidi Swapp - Minc Machine  which  through a heat process adds foil to cards for a really lovely look

As soon as I can I will add some videos to the blog to show some of the things I have done with my new toy but this week it is decorating and carpet shampooing .... busy busy busy !!

This card has the foil added to the background panel and is a really shiny hot pink shade.

Over the top I have layered  Medallions Three and added it with foam tape to give height.

The white Hammered card is from the Papermill Direct. and creates a good base for most of my designs.

The flowers are from  Wild Orchid Crafts  and they have been sparkled up with Glitter Magic

The little sentiment is from  Clearly Besotted Stamps  and I have just bought a whole load of new stamps and matching dies from them which I will also show you over the coming weeks. They are gorgeous too.

So Santa came early to my house and I am really pleased with my gift
 .... from me  .. to me!!

More tomorrow ...

Hugs xx


December 09, 2015

White Christmas ...

Hi Everybody,

Last week I showed you three cards all made with the same set of dies but varied  the colours in each one for a different look

This card is still with the same set of dies but I have kept this one all white.

So once again I have create the base card with  5x7 Matting Basics A&B and added another white panel which I have embossed.

Then I used the Mystical Embrace  and added it with foam tape underneath to raise it up.

The next layer is Victorian Bow and another plain oval in which I have stamped and heat embossed the verse

The beautiful flowers are from Wild Orchid Crafts  and they have been sparkled with Glitter Magic 

Adding in the foam tape or pads to the layers gives the card more depth and creates shadows.  They don't need to be really thick ones just enough to give that interest

If you are going to stamp and heat emboss your sentiments then it is less messy if you stamp in the colour you want the words and then heat emboss in clear.

More tomorrow ...

Hugs xx


December 08, 2015

Tuesday Tutorial - Fluer de Elegance

Hi Everybody,

For todays tutorial I thought I would mix several dies together.  All the dies that you may have in your own "Stash" will be so versatile and will work together ... it's only fear that stops you from experimenting, especially if you are new to card making
  But remember that it is only card and paper and if it doesn't work then start again.  
For this card I have mixed old and new dies and the result is very pretty

 Spellbinders Supplies:
Other Supplies:
Instructions:

With #7 Matting Basics A and white card cut two and hinge together to form the base card
With #7 Matting Basics B cut another layer in orange Co-ordinations card and with any folder that you have emboss and sand this piece
(Please remember that  #1 is always the smallest die)
With #3 Fleur de Elegance cut  and emboss the largest panel in white
With #2 from the same set cut two in white and stamp and heat emboss one of them 
With =4 from Oval Majesty cut one piece in white
With any oval die that you have cut another panel in orange that will sit in the centre of the oval
Cut all the petal pieces from the Cinch and Go Flowers from the peach Craft Foam and layer them together securing with a large pearl brad
Cut the flourishes in green card
Layer all the pieces together using foam tape in between the layers and adding in the ribbon so that it can be secured on the back.
Add them all to the base card for a neat finish.
Add the smaller sentiment at an opposite angle for a different effect.
Add in the Craft Foam flower and the flourishes to the card and finish with a small bow 

More tomorrow ...

Hugs xx


December 07, 2015

Visit to Santa ...

Hi Everybody,

Yesterday my youngest daughter Vickie and I took Isabella to see Santa. Here they are !!

Vickie is Grandmother and I am Great Gran to the beautiful four year old Isabella and we had a lovely day out.

The weather was really kind to us after all the rain on Saturday and it wasn't all that cold either.

We wrapped up warm and off we went
 We took her for afternoon tea in a really quaint little cafe am the man that served us had a turkey hat on which highly amused Isabella

The afternoon tea was served on layered platers and it was plentiful

Jelly and Ice cream were served to her in little buckets complete with spade and she ate most of it too

And in the cafe Isabella and I sang "Happy Birthday dear Nana"  to Vickie as it was her birthday that day


 Then it was off to ride the land train into Astley Park as Santa was at the big old house inside the park.

She was so excited to see the train .. Vickie I mean and Isabella loved it too ..... and me !!

We waved to everybody that we passed as we drove through the streets to the park and as we got nearer to the house Santa was waiting at the door to greet us.

All the children on the train were so  pleased to see him and they were all calling out to him

Face painting was the order of the day before Isabella went to see Santa and it was part of the cost of the ticket

There where several options for the design but Isabella was set on having Santas face.

The lady said she would do a special one with some flowers for her and this was the end result.

Of course we had one really pleased little girl for the rest of the day.

So now with this pretty paint work it was off to visit Santa in his Grotto

She was very quiet when she met him but said "Thank you  Santa " for the gift he gave her.

Then once outside she couldn't wait to open it.

In another part of the park there was an exhibition of the the artist who had painted the Gruffalo and we went to see that too.

The artwork is lovely and of course Isabella knew who the character was

This is Vickie reading the story of "Room On The Broom" to us but Isabella wanted to be off exploring .... I thought it was very good though !!

Then  all too soon it was time to get back on the land train and head back into town, and by now it was going dark.

Chorley is lit up with Christmas lights and it looked really pretty as they twinkled in the growing darkness.

Vickie and I started to sing some songs and to our surprise others joined in too. So if you where on the that train listening to the catawailing then you have my sympathy

Rudolph The Red Nose Reindeer, Jingle Bells, Away in a manger and others were all sung loudly

On the way back home in the car we sang several verses of "If Your Happy And You Know It" and we each made something up for the song to be happy about.

There was a lot of noise and laughter on out day trip and we took Isabella back to her mum tired and happy. She was a pleasure to take out and a joy to be with and Vickie was a good girl too.

More tomorrow ...

Hugs xx


December 05, 2015

Card Winner ...

Hi Everybody,

My what a day ... it's cold wet and blowing a gale. I am hoping it is a little better tomorrow as Vickie and I are taking Isabella to see Father Christmas. 

Vickie is the Grandmother and I am Great Gran to four year old Isabella and I don't know who is more excited about this visit than Vickie and I.  It will be wrap up warm weather but a good day out. 

It is Vickies birthday also which makes it even better

The card draw has been done for the card offered yesterday and the winners name is ...

Scrapper  
Can you email me your postal address please to 
christina@card-making-magic.com
and the card will be in the post to you first thing Monday morning.

You have 48 hours in which to claim  the card and I hope you will like it when it arrives.
Please let me know when you do .

So no post tomorrow but I will be back on Monday
Have a lovely weekend

Hugs xx

December 04, 2015

Friday Freebie 096

Hi Everybody,

Pretty in pink is another of those cards created with the Lace and Frills texture plate from Spellbinders

I have added in some Guipure lace and satin ribbon for this card with a beautiful pink rose from Wild Orchid Crafts

I have tied the ribbon from Mei Flower into a single bow and threaded it with a pearl string

This card could be on its way to you if you leave me a comment at the end of the post.  One name will be chosen from the list of comments and the winner notified on the blog tomorrow.

If you add your name then PLEASE come back and check if you have won as you only have 48 hours from when it is listed to claim the card.

I do this because each week a card is given away and I don't want a back log of cards waiting to be claimed and then posted.

More tomorrow ...

Hugs xx

December 03, 2015

Green, Red and Silver

Hi Everybody,

Here is another of the Christmas cards with red and green as the foundation but this time I have teamed it with Silver.

I have used once again the Mystical Embrace  as this is such an elaborate die that really makes a statement  on your cards

The flowers are from Wild Orchid Crafts  and is another of their Poinsettia Flowers

I have added sparkle to their petals with fine glitter from Glitter Magic

 For the next card I have used exactly the same die and sentiment ... just altered the colour way a little.

But it gives a fresh take on things

And with the card from yesterday where I used the gold card on the design you have three different looks from one die.

More tomorrow ...

Hugs xx  

December 02, 2015

Traditional Christmas Colours

Hi Everybody,

Todays card is for those who prefer the traditional look of red, green and gold for their Christmas Cards

All the card,  that I have used, apart from the gold, is 255 gsm from Papermill Direct   and there is a vast array of colours for you to choose from.

But it is a UK based company and maybe they will not ship abroad ... you would need to check that for yourself

The large Poinsettia flower is from Wild Orchid Crafts and I have sparkled it with glitter.

The holly branch is from AnnaMarie Designs

The gold card has been cut with the 5x7  Mystical Embrace from Spellbinders and it creates a lovely focal point for your cards.

The sentiment is from Crafters Companion and it is one I have used many times

More tomorrow ...

Hugs xx


December 01, 2015

Tuesday Tutorial - Mary Border Strip

Hi Everybody,

Border strips are very popular at present,  especially those with a separate cutting edge that makes them even more versatile.  A few weeks ago I showed you how to create the box sides using another border strip but today we are going to make a card using the Mary Border Strip from Spellbinders

Spellbinders Supplies:
Other Supplies:
With die #7 from Matting basics A cut two and hinge them together to create your base
With die #7 from Matting Basics B cut one panel in white and emboss it with any folder that you have in your "Stash"
With die #6 from Matting Basics A cut another layer in pink 
(Please remember that #1 is always the smallest die)
With the Mary Border Strip cut the solid panel in pink with the outer cutting edge and the with both dies together cut the patterned piece. 
With small foam pads in between the layers,  add these two together
With the pink panel place the inner section of the border strip onto your card keeping it over to one side and pass it though your die cutting machine. Tape the die in place so that it won't move.
Carefully remove it and  add it to the other side of the card and keep it well over to the side.
 Place foam pads in strategic places on the back of the panel so that they cannot be seen from the front and add this to the white embossed layer
Stamp and heat emboss your sentiment onto some parchment that is wide enough to wrap around the layers and be glued on the back
Place the  separate cut out panel in between the two cut into the pink card and use foam pads to give extra height to this one.
 Adding in the foam  creates shadows and depth and makes the card look better than simply being flat
Wrap these layers with pink ribbon and the parchment strip, and secure on the back before adding them to the base card.
I have tied a double bow and added it to the ribbon with a flower centre to cover the knot.
And finally I added in the pearls at the top and bottom of the parchment strip

More tomorrow ...

Hugs xx